

In my previous tutorial I explained robots.txt and how to get one but today I'll give you a complete guide on how to enable your custom robots header tags in blogger.
First of all I'll like to explain the meaning of each and every option available to be ticked In custom robots header tags.
1. all:
If you tick this tag, crawlers are not
bound by any constraints. They can freely crawl, index and expose your content.
2. noindex:
Not all the blogs are for public notice. Even if you don’t share the URL of your personal blog with anybody, chances are
people will come to it from search results. On such a scenario, you can use noindex tag as it prevents search engines from indexing the
pages.
3. nofollow:
Nofollow and dofollow tags are for outbound links. Dofollow is the default robot tag for all your outbound links. That
means the search engines can sneak upon the pages you linked to. If you don’t want search bots to look through your links, addition of a nofollow tag is the solution.
4. none:
None combines the features of both noindex and nofollow tags. The crawlers will neither index your pages nor skim through the links.
5. noarchive:
You might have noticed a
cached label with most of the website links on SERPs. It shows that Google has captured a copy of your site into their server to display in
case it goes down. That being said, the noarchive tag turns off cached version in
search pages.
6. nosnippet:
The text snippets in search
results help people find what’s on the webpage. If you want to keep the content
exclusive, you can turn this header tag on.
7. noodp:
Open Directory Project or Dmoz is a man-made directory of websites. Google
use the information from there sometimes. You
can turn it off with this tag if you want to.
8. notranslate:
Do you want to disable
translation on your site? Then use notranslate for the exact purpose.
9. noimageindex:
If you allow Google to index your images, people may steal it and use on their own websites. To prevent that, you can keep the images deindexed using noimageindex tag.
10. unavailable_after:
In Blogger, you will get
a field right to this tag. So, the webpage will
be deindexed after this time.
OK now that you know the meaning of each option you are going to pick now let me tell to the ones to select for better seo.
How to configure custom robots header tags in blogger for better seo.
1 First of all go to your blogger dashboard.2 Now go to search preference and enable custom header tags.
3 Configure your custom robots header tags according to this screen shot.
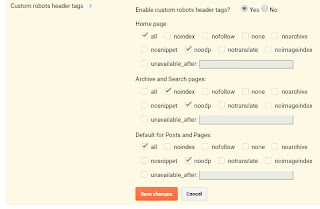
4 Save and enjoy your increase in seo.
Warning
Make sure you get these steps correctly don't make any mistake you can watch the video I made below to see how it's done.
Make sure you get these steps correctly don't make any mistake you can watch the video I made below to see how it's done.
Conclusion
Well that's how to configure your custom robots header tags you can read how to get and configure custom robots.txt here
You can visit our support and motivate us page to motivate us to keep sharing.
Well that's how to configure your custom robots header tags you can read how to get and configure custom robots.txt here
You can visit our support and motivate us page to motivate us to keep sharing.


0 Comments